jQuery EU Cookie Law popups

UPDATED: GDPR compliance with the jQuery EU Cookie Law plugin

The EU Cookie Law does actually seem to apply to most of our websites — we are based in the UK and are using Google Analytics, so there is no way out. Useless as it might be the e-Privacy Directive, the worst part is the scam-like pages that offer “solutions”. Instead, I just went ahead and created a plugin that can be installed by adding 4 lines of code.

An easy-to-install jQuery plugin to create EU Cookie Law popups.

Supports multiple layouts out of the box. Works well with Bootstrap 3. Easy to customize markup and CSS.

This is the demo page. For the code, install instructions and to see how amazingly free it is, go to Github.

Get started

To get started, first include jQuery and import the plugin’s files:

<script src=”js/jquery-2.1.3.min.js”></script>
<link rel=”stylesheet” type=”text/css” href=”css/jquery-eu-cookie-law-popup.css”/>
<script src=”js/jquery-eu-cookie-law-popup.js”></script>

(Mind you, you need to run the code on a webserver to be able to set cookies.)

Simple popup

In its simplest form, you can add an EU Cookie Law popup by simply adding the “eupopup” classes to any HTML tag.
<body class=”eupopup eupopup-top”>

You can also choose from these layouts:

jQuery EU Cookie Law popups (demo)

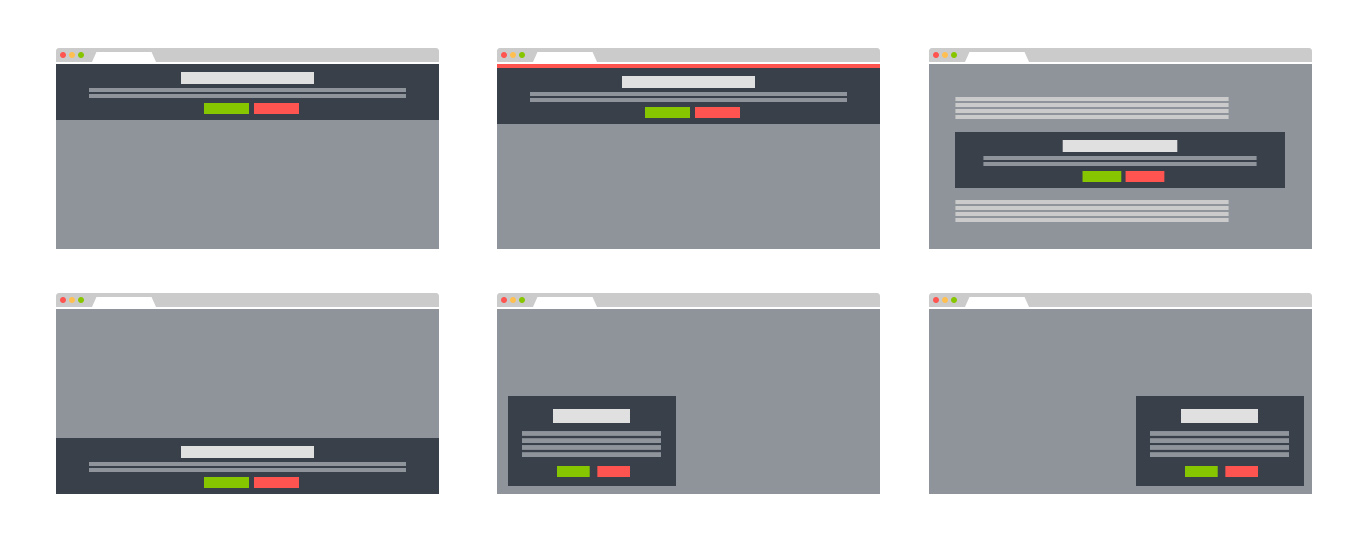
  • Top of the page (“eupopup”, or “eupopup eupopup-top”)
  • Fixed banner on top (“eupopup eupopup-fixedtop”)
  • Fixed to bottom (“eupopup eupopup-bottom”)
  • Fixed window, to bottom left (“eupopup eupopup-bottomleft”)
  • Fixed window, bottom right (“eupopup eupopup-bottomright”)
  • Inline (“eupopup eupopup-block”)

And these colours or styles:

jQuery EU Cookie Law popups (demo)

  • White text on dark background (“eupopup-color-default”)
  • Dark text on light background (“eupopup-color-inverse”)
  • Compact (“eupopup-style-compact”)

Custom HTML

To use a custom HTML markup, you can either add it as a Javascript parameter (read about it later), or by adding a DIV with the classname “eupopup-markup”.
<div class=”eupopup eupopup-container eupopup-container-block”>
  <div class=”eupopup-markup”>
    <div class=”eupopup-head”>This website is using cookies</div>
    <div class=”eupopup-body”>We use cookies to ensure that we give you the best experience on our website. If you continue using the site, we\’ll assume that you are happy to receive all cookies on this website.</div>
    <div class=”eupopup-buttons”>
      <a href=”#” class=”eupopup-button eupopup-button_1″>Continue</a>
      <a href=”http://www.wimagguc.com/?cookie-policy” target=”_blank” class=”eupopup-button eupopup-button_2″>Learn more</a>
    </div>
    <div class=”clearfix”></div>
    <a href=”#” class=”eupopup-closebutton”>x</a>
  </div>
</div>

Parameters

The script takes quite a few parameters. The suggested method to override these is from the init method (find the out-of-the-box one in the jquery-eu-cookie-law-popup.js):
$(document).euCookieLawPopup().init({
  cookiePolicyUrl : ‘http://www.wimagguc.com/?cookie-policy’,
  popupPosition : ‘top’,
  colorStyle : ‘default’,
  compactStyle : false,
  popupTitle : ‘This website is using cookies’,
  popupText : ‘We use cookies to ensure that we give you the best experience on our website. If you continue without changing your settings, we\’ll assume that you are happy to receive all cookies on this website.’,
  buttonContinueTitle : ‘Continue’,
  buttonLearnmoreTitle : ‘Learn more’,
  buttonLearnmoreOpenInNewWindow : true,
  agreementExpiresInDays : 30,
  autoAcceptCookiePolicy : false,
  htmlMarkup : null
});

Events

If you need to be notified about the consent somewhere in your code (for example, to enable the cookies in other parts of your software), you can listen to the ‘user_cookie_consent_changed’ event.
$(document).bind(“user_cookie_consent_changed”, function(event, object) {
  // true or false
  console.log(“User consent: ” + $(object).attr(‘consent’) );
});

As seen on

j j j

Kickstart any app idea: our recipe

It’s easy to be in the centre of attention if you have something cool to offer. Developers are a hot asset now: every now and then, someone wants our agency to do a mobile app for revenue share, a website for future buyout, or me, in person, to be the CTO of a new gig.

I love all these projects.

No, really, I do.

Not because they bring much cash or fame, as I don’t tend to earn much with most of them. But it’s always great to learn new teams and methods, and these projects provide a good field for experimentation.

Quite some guidance may be needed on the project setup and management though, especially if my co-founders lack experience with tech products. Here is the three points I like to send out to them, right at square one.

Our plan to kickstart any tech project (mobile apps, websites etc).

  1. Almost immediately start working on an initial prototype.
    Creating the prototype helps exploring the idea internally, and will also help explaining it once you can start attracting potential investors and new team members.

    By creating a demo product you will need to set up most of the tools and methods needed to – well, to create a product. So it can be nothing but super easy to demonstrate the team’s ability to bring an idea to the market – which can significantly help the negotiating positions with a VC.

  2. Set up the development workflows.
    Any rapid iteration process would do. The key is to answer this question: if anyone comes up with a new feature or idea today, how will that be incorporated in the product and reach the market tomorrow?

    There are a lot of free tools (like Trello or Asana) that will help teams keep track of these features. The bottomline with choosing one is: every new pair of eyes should be able to tell where the company is standing, just by taking a look at the dashboard.

  3. Start PR & marketing efforts from day one.
    Have you ever wished you had a handful of people to ping when you are ready to launch? Set up a ‘coming soon’ landing page and collect subscribers as soon as you start thinking about the product and that is taken care of.

    The rule of the thumb is to always start with the things that can be potential bottle necks, and a good marketing is one of these. First step here is usually to choose a good name, create a corporate identity with a nice logo and an initial mission statement. This will help strengthen the product as well as the team, especially with remote ones.

We tend to do the above in no particular order, and in strong collaboration with the business development. The idea is to get the product only far enough so that we can find out whether there is a market fit for it. If the answer is yes, the foundation to create the next version of the product is as good as it can get.

j j j

Bintan, Indonesia: free wallpaper downloads

On my latest trip in Asia I had the time to meet up with friends and go for a weekend getaway to Bintan, Indonesia. This is a truly beautiful island with gorgeous blue skies and a turquoise sea, so it’s no wonder that we took some pictures before jumping in the water.

Bintan, Indonesia - free wallpaper from Wimagguc

These photos then ended up being my wallpaper, bringing the summer to the cold Northern Europe. Please find the screens available for download below:

Bintan, Indonesia - free wallpaper from Wimagguc

Bintan, Indonesia - free wallpaper from Wimagguc

To take the photos I was using my good old Nexus 4’s sub-awesome camera, hence the huge amount of noise. I tried to remove that with some lightweight Photoshop editing, and then doctored a somewhat more natural, diapositive-like colour too. I’m quite happy with the Cereal Magazine style, but feel free to argue on Twitter.

The wallpapers are free for personal use. (Please contact me if you want to use them elsewhere.)

j j j

Custom UIAlertView for iOS

It was a common pattern for iOS developers to create customised dialogs by attaching a subview to a standard UIAlertView. Since iOS7 however, Apple removed this feature and developers are left without a dialog pattern that matches the iPhone UI.

As a solution, I wrote an open source class to create an iOS8-style dialog which can be extended with any UIViews or buttons. The animations and the looks are copied too, and no images or other resources are needed.

You can just grab the open source code from Github now. In this article I will write about the implementation best practices and some background info.

Extend your current AlertView code to support iOS7 and iOS8

To create an AlertView with a custom subview, you probably wrote something similar to this:

And you did probably reset the frame in the delegate method willPresentAlertView too.

This was working on all previous iOS versions. On iOS7 however it will result in an empty dialog. What you have to do therefore is to fork the code here: display a standard UIAlertView on the old devices, and a CustomIOSAlertView on the new ones.

Forking the code is as simple as this:

For the new dialog, you would add something like the following:

Putting these two together, a full solution would look like this:

And that’s it! For the CustomIOSAlertView is a hack-free UIView, you don’t have to add anything to the willPresentAlertView delegate, just keep it as it is. For handling the iOS7 button clicks, you can use code blocks or delegates – please refer to the project’s readme.

How did we end up here?

Apple never officially supported the addSubview method of the UIAlertView. Their approach is to use this dialog only for a small subset of functions, like a plain text input. This is as easy to do as setting the style of the UIView to UIAlertViewStylePlainTextInput.

However, UI/UX designers like to use the dialog pattern for other use cases as well. An example is to show a simple image to the user, or display a progress bar while the user is waiting for a background download to be finished.

Until the previous iOS version the addSubView method worked fine, and developers used it as a best practice for these dialogs patterns. That’s why Apple’s move left app publishers in a bad position: before rolling out the updated version of our apps, in some cases we have to find a completely new user journey.

This is where the CustomIOSAlertView comes handy: we can roll out the iOS7-support quickly (and start up the user experience think thank in the background).

(Free code and source from Github. Opinions, debate: @wimagguc on Twitter.)

j j j

Why the software industry needs more short-time jobs

How taking short-time projects will make you a better developer, and how managers should hire those brains to give a long lasting boost to the software team.

Being a good developer doesn’t end with having a deep understanding in the technologies and languages you use. It goes even further than knowing the ins-and-outs of the tools, patterns and algorithms you utilise on a daily basis. To be a great developer you have to constantly research, and adapt the new solutions and technologies others invented.

So if you are programming Java websites since university, the least you should do is writing some Android apps on the side. It might be the same language and tools, but you will surely end up looking into some UI/UX stuff that will broaden your mind and skill set.

Corporates have a good reason to keep programmers dumb

Experimenting with new technologies is not what usually happens within corporates though. Engineers are paid to provide a solution that works, within the shortest time frame and with the most certainty that the software will not break. Not exactly the best place to be creative and invent new stuff.

This is one of the key factors for most of the workplaces not using the latest software or technologies: implementing those takes time, and sure: why would they bother updating something that worked just as fine before? It may be totally understandable, but that’s how you end up with software running on Java 1.5 and office documents written with Office 2007.

Reading Hacker News? Come on. Xkcd, maybe, if it was fun.

Start small, start quick

It’s very usual to get comfortable after having the same job for years. Showing up at work just a bit late, having a long coffee break in the kitchen, starting the morning with Facebook and Twitter – and at the same time, feeling more and more tired of work

This industry has a crazy pace though and having an up-to-date knowledge doesn’t come easy. It’s already hard enough to predict which technologies will stick in the long term. Who could tell if it’s better to start with iOS or Ruby now? How many months before Nokia was going down did Symbian developers start looking into Windows Mobile code? (I actually know this last one: two.)

Cash in for what you learned

Committing for something completely new would be too much of an investment, and perhaps not very wise either. First, it’s hard to find the time in the evenings and weekends to learn. Second, with those few projects you can launch, or the 1-2 years of experience you may gain, you will probably look at a lower salary level than at your current workplace with 2+.

There is a way to learn some new tricks quickly though. They say that the only way you can get better in chess is to play with someone who is better than you – and the same rule applies very well in the field of programming too.

Good enough reason to be in the market for short-time projects. If you change your jobs every 6-12 months, you will be introduced to many more projects and even more people, exposed to new technologies on a daily basis. All of this you can learn from, and the new stuff will look great in your CV.

And a great CV eventually leads to a fat pay check.

Managers, this is what you do

If you are leading a software department, now you think you shouldn’t keep the employees for too long with the company. This is hardly the case. All you need to do is to hire some developers for a few months, every now and then.

They don’t even need to be the best fit for a project. The more experience a programmer has with other technologies the better, but the main thing to make sure about is that during the project, the outsiders should be well integrated within the team.

Everything else is magic.

j j j

Remote setup for Android and iOS made easy

Developing a new mobile application takes a lot of iterations: with every new version we are adding new features, polish the old ones, measure user acceptance – and react as fast as possible.

However, with the long App Store submission process and the even longer period until Android users update their apps, it usually takes a while to experiment with new features.

To find the features people will love is the key to win a whole lot of hearts: hearts, that belong to the new users. The faster you can find out what product the users really want, the better – that’s why marketers keep using A/B tests for almost everything.

On mobile though, the free and paid split test solutions usually aim too much: they come with statistics, robust close-source SDKs (that crash all the time), and these services want you to commit for life and beyond.

That’s why we created AppWoodoo. A minimalistic, open-source SDK and a lightweight backend service that does exactly what you expect: receives a new list of settings every time you want it.

So, say, you can switch off Facebook login as soon as it turns out people leave your app for that. Or just add a “my mood” section which you can update daily.

If you are already eager to try it out, please do so. The SDKs are on Github (iOS, Android), and the service is live on appwoodoo.com

And now, some coding magic, with Android (you can do pretty much the same on iOS as well though).

In this example, we will create a simple screen to remotely display or hide a Login button, and measure the clicks via Google Analytics.

1. Add the settings on AppWoodoo

In this example I added the ENABLE_LOGIN_BUTTON setting and set it to false. (Go to appwoodoo.com, and create an app to get started.)

2. Integrate the SDKs

You will need the Google Analytics SDK and the AppWoodoo SDK; both are available for free.

3. Start to code

First, we add a loginButton in the xml (notice that the button is not visible):

j j j

Google Maps Latitude and Longitude Picker

A jQuery Latitude and Longitude plugin to pick a location using Google Maps.

Supports multiple maps. Works on touchscreen. Easy to customize markup and CSS.

This is a demo page; the newest live demo will always be here.
For the code, install instructions and to see how amazingly free it is, go to Github.

Basic functions

  • Move the marker on the map to receive the updated latitude, longitude and zoom values in the hidden fields
  • “location_changed” event will be fired, with the gllLatlonPicker Node JS object as attribute for easy access

Move the marker, or double click on the map.

Google Maps

<fieldset class=”gllpLatlonPicker”>
<div class=”gllpMap”>Google Maps</div>
<input type=”hidden” class=”gllpLatitude”/>
<input type=”hidden” class=”gllpLongitude”/>
<input type=”hidden” class=”gllpZoom”/>
</fieldset>

Simple form with a Google Maps search field and default values

  • If the search has results, the first element will appear on the map (with the default zoom value 11)
  • You can set default latitude, longitude and zoom values in the hidden fields
  • If you don’t give an ID to the map, the script generates one; feel free to use custom ID’s though

Move the marker, or double click on the map. Search for cities, countries or landmark names.

Google Maps

<fieldset class=”gllpLatlonPicker” id=”custom_id”>
<input type=”text” class=”gllpSearchField”>
<input type=”button” class=”gllpSearchButton” value=”search”>
<div class=”gllpMap”>Google Maps</div>
<input type=”hidden” class=”gllpLatitude” value=”52″/>
<input type=”hidden” class=”gllpLongitude” value=”1″/>
<input type=”hidden” class=”gllpZoom” value=”12″/>
</fieldset>

Reverse lookup: retrieves the location name once it’s picked

  • After the position change you’ll have the location name in the gllpLocationName field.
  • If there is no value, the field will be emptied.
  • The “location_changed” event will also be fired with the gllLatlonPicker Node JQuery object as attribute.

Move the marker, or double click on the map.

Google Maps

Found:

<fieldset class=”gllpLatlonPicker”>
<div class=”gllpMap”>Google Maps</div>
<br/>
<input type=”hidden” class=”gllpLatitude”/>
<input type=”hidden” class=”gllpLongitude”/>
<input type=”hidden” class=”gllpZoom”/>
<input type=”text” class=”gllpLocationName” size=42/>
</fieldset>

Editable and selectable Latitude/Longitude values

  • You can set your own latitude, longitude and zoom values. The map shows your data after pressing the update button.
  • You can still hide the Zoom field (or any other fields)

Move the marker, double click on the map, search, or set new values to interact.

Google Maps

lat/lon: / , zoom:

<fieldset class=”gllpLatlonPicker”>
<input type=”text” class=”gllpSearchField”>
<input type=”button” class=”gllpSearchButton” value=”search”>
<br/>
<div class=”gllpMap”>Google Maps</div>
lat/lon: <input type=”text” class=”gllpLatitude” value=”20″/> / <input type=”text” class=”gllpLongitude” value=”20″/>, zoom: <input type=”text” class=”gllpZoom” value=”3″/> <input type=”button” class=”gllpUpdateButton” value=”update map”>
</fieldset>

Released under free (do whatever you want) license.


j j j

Node.js static http server with GZIP support (for Heroku)

One of my favourite solutions to serve static files is on Heroku, with Node.js: lightweight, easy to setup, easy to configure and highly scalable – awesome features, these.

However, when you serve static files, the users’ internet provider sometimes changes those. An example is when the carrier compresses the javascript documents or resizes the images to provide faster downloads. This will result a mismatch in file hashes, which, with some javascript frameworks like the Sencha touch SDK, leads to fatal app breakdowns.

An easy method to avoid this is to gzip all data ahead. Fortunately, Node.js has a built-in zlib module after v0.6.13, so writing a static http server with gzip support is a breeze. You can get my code from github: it comes as a Heroku project, so if you don’t want to configure anything, just replace the files in the ./app folder and you are all set to go.

To check that your setup works, use the following commands:

$ curl http://nodejs-static-http-with-gzip.herokuapp.com/ --silent --write-out "%{size_download}\n" --output /dev/null

$ curl http://nodejs-static-http-with-gzip.herokuapp.com/ --silent -H "Accept-Encoding: gzip,deflate" --write-out "%{size_download}\n" --output /dev/null

…where the resulting number is the size of the downloaded file – if you get a smaller number running the second command, it means that the server is sending gzipped files for a browser that supports them.

(Remember that ngix, perhaps the most popular fronting server for Node.js already supports gzip – therefore you only need this trick on Heroku and similar environments.)

j j j

Moving my WordPress blog to Heroku (and Amazon S3)

Knowing that there are plenty of pages out there to walk you through the exact same thing, I won’t make this guide too long: only five steps, with some bullet points for future reference.

1. Create a Heroku project

  • Create an empty folder, locate it in Terminal and:
    $ git init
    $ git add .
    $ git commit -m "init"
    $ heroku create
  • Setup the name of the Heroku app and make your domain point to it
  • Add a ClearDB database to this Heroku project

2. Make a copy of your WordPress site

  • Download all WordPress files and copy them to the Heroku project’s folder
  • Create a dump of the database (the easiest way is to use this WordPress backup plugin)
  • In the Heroku project, make sure all domain values in the files’ content point to the right address. I had quite a few ‘hardcoded’ values in the footer still pointing to wimagguc.hu – a quick search and replace on all textual files took care of this.
  • Pro tip: if you had a .htaccess file, make sure to copy that as well

3. Migrate your database to ClearDB

  • Connect to ClearDB via MySQL Workbench (or a similar tool), and import the SQL dump you created in step 2.
  • Your articles and settings will still point to your old domain. Fix these with three simple updates:

    UPDATE PREFIX_wp_options SET option_value = replace(option_value, 'www.OLD-DOMAIN.com', 'www.NEW-COMAIN.com') WHERE option_name = 'home' OR option_name = 'siteurl';
    UPDATE PREFIX_wp_posts SET guid = replace(guid, 'www.OLD-DOMAIN.com','www.NEW-COMAIN.com');
    UPDATE PREFIX_wp_posts SET post_content = replace(post_content, 'www.OLD-DOMAIN.com', 'www.NEW-COMAIN.com');
  • Edit your wp-config.php:
    $db = parse_url($_SERVER["CLEARDB_DATABASE_URL"]);
    define("DB_NAME", trim($db["path"],"/"));
    define("DB_USER", $db["user"]);
    define("DB_PASSWORD", $db["pass"]);
    define("DB_HOST", $db["host"]);

4. Make The Heroku project run locally

  • (Now this step is far from mandatory, but I find it easier to add plugins and double check everything on localhost.)
  • You probably have your xAMP environment set up already. So did I, and therefore all I needed to do was to:
  • Set the CLEARDB_DATABASE_URL variable to whatever URI “heroku config | CLEARDB_DATABASE_URL” displays
  • Create a symlink to your apache document root: “ln -s /Users/wimagguc/heroku-wordpress-folder/ /var/www/heroku-wordpress-test”

5. Add S3 to handle file uploads

  • The best practice is to keep dynamic file content off from Heroku: in case you have multiple instances running, files uploaded to one dyno might be missing from other ones. Keeping all uploaded files on Amazon S3 is one way to solve this problem.
  • Go to amazonaws.com and register for Simple Storage Service (now there is a free usage tier for the first year!)
  • On the S3 console, create a bucket for your blog
  • Get the login credentials from Amazon
  • Install this great S3 for WordPress plugin and set it up to use with your bucket

Further reading:

j j j

Tweet embedding in WordPress

With the new WordPress version, quoting a tweet from Twitter is as easy as copying the direct link to the post’s body. The blog engine then pulls the text (or the whole conversation) from Twitter, and replaces the direct link with the whole lot.

That means, this: “http://twitter.­com/wmguk/status/213682841010192384” becomes this:

The tweets seem not to be truly cached and embedded in the post though: they will keep being displayed in the blog only until the original texts on Twitter are still in place. After deleting those, only the original direct link will be displayed in your live website, which makes the whole thing rather fancy – but not very usable.

Update: another downside, the text of the tweet seems to be the only thing displayed in the feed.

j j j